.......................................................................... ....................................................................... ......................................................................
Showing posts with label Software-Tips. Show all posts

Saturday 12 October 2013

How to Download Facebook Video in Android Mobile!

Do you know you can download facebook video in Android Mobile. Lets see detail procedure to download facebook videos in your android phone.As we know there is no option available in Facebook to download a video to our computer and phone as well, we can just watch them in Facebook.


However, we can get our favorite videos directly to our android smart phone using a third-party application called as “ES file explorer” which is available to download for free on Google play store. With using this app, we can store any Facebook video very quickly, and it’s very easy too.  Just scroll down to read step by step fully explained tutorial.

How To Download Facebook Videos in android Mobile:


As I said earlier, we need to use a third-party application to do this. I explained the whole process from the scratch, especially for newbie’s.

  • Go to Google Play store application, search for ES File explorer app there. Once you found it, download and install the app in your device.
  • I hope you already have Facebook android App installed in your device, otherwise download & install it from the same Google play store.
  • Now open the Facebook app, and log in there using your email id and password as usually.
  • Search / open the video which you want to download, and then touch on the play button which appears on center of the video screen.
  • Once you taped on Play button, it will open a pop-up window like shown below.
  • There you need to click on “ES Downloader” if you wish to download that video. Immediately you will see download process of your video.
  • Once downloading has finished, you will see your downloaded video in gallery of your smart phone.
     
That’s all. Now you can start downloading all of your favorite videos to your smart phone, without any cost. The advantage of downloading FB videos to your phone is you will be able to watch them anytime.


To Download → ES file explorer


Saturday 17 August 2013

Find your Lost Smartphone with Android Device Manager


Way to locate lost smartphones using Android Device Manager

It really hurts once your new phone is purloined. It’s even worse after you haven't recognized the same phone in others hand. iPhone users are already using Apple’s iCloud service to search out their stolen phones for a moment, however there’s been no official comparable service from Google none the less. Google recently proclaimed the approaching launch of the Android Device Manager. It’s a replacement feature for Android phones running version 2.2 and up that works with a great deal like Apple’s iCloud once it involves finding lost phones. Android Device Manager will find your lost Android Smartphone and provides you a number of choices like wiping the data on the lost Android device within the case of it being stolen by some wicked person.
 

So, here is the question raises on how to locate and ring your misplaced device. If you over up dropping your phone between those couch cushions, Android Device Manager will rescue you to quickly ring your phone at most volume. Therefore you'll notice it, even it’s been suppressed and within the event that your phone or pill is out of, you'll find it on a map in real time.
 
 
track android device manager
 
How realistic it is. You can even protect the personal data and crucial information that present on you Android Smartphone. If you are trying to catch the lost phone then, Android Device Manager will assist you by sending the information from ending up within the wrong hands. If your phone can’t be recovered, or has been purloined, you'll quickly and firmly erase all of the information on your device within few moves.

Here is the way on how to do it

After the release of Android Device Manager, do change these settings to get registered with latest Android Device Manager to track lost smartphone. As we are expecting that this application will be added by default on all supporting devices like wise happened with Google Settings app.
 
  • After downloading the app, register your smartphone with Android Device Manager by signing into Gmail Account.
  • Now, when your mobile fell down somewhere or purloined, reach nearest PC and select the best option as per your requirement whether to wipe the data or to ring the mobile phone.
 
To repeat, Android Device Manager are going to be out there on all devices running Android 2.2 and above, later this month. Google notes that you just ought to be signed into your Google Account to make use of it.

Remove Background Music from Songs using Audacity


How to remove vocals from MP3 Songs

Do you want to sing your favourite song along with background music? Then this tutorial might help you to get it done. It is possible to remove background music from a song if it is in stereo mode using a piece of free software called Audacity. This software is actually handy and will provide a full version of converted song without any hassles. Before proceeding to remove vocals from MP3 songs, it should be checked that the particular song is in stereo or in mono mode. Currently this free vocal removal software called Audacity only supports songs which are composed in stereo mode.

What is Audacity?

Audacity is free open source software that allows user to record audio or to edit the audio files. Apart from these, it has an awesome feature of removing vocals from MP3 songs within few steps. With the help of Audacity, it is possible to separate background music from song and can sing the vocal of the particular song in a party that you are hosting. How awesome it is?

How to Separate Vocals from Songs?

This day, we would like to explain the procedure of using Audacity to remove vocals. This can be achieved in few steps and we will explain the same with the support of images. However, based on the amplification of the song, vocal remains same but with compressed volume.
 
how to remove vocals from songs
 
Step 1: Download Audacity Free Software from the official website and install it on your PC that runs with Windows, OS X, UNIX and Linux.

Step 2: After installing, import the audio file which you want to remove vocal. Tip: You can even drag and drop the song.

Step 3: Now observe the image carefully and split the audio into two by choosing "Split Stereo Track".

remove background music of song
 
Step 4: Now select the below track (should turn to grey).

remove vocals from mp3 songs
 
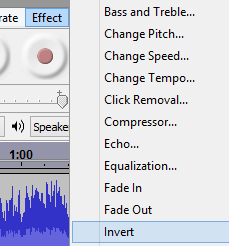
Step 5: After selecting, go to "Effect" then choose "Invert"

seperate background music from songs
 
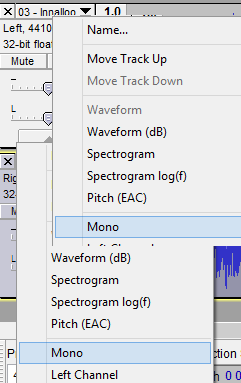
Step 6: This is the final step. Turn both the separated tracks to Mono.
 
using audacity
 
That’s it. If you still get the vocal, try changing amplification settings. Do remember this software will only remove background music of song when they composed in stereo mode.
 

Saturday 18 May 2013

Gmail, +1s, Blogger, Contacts and Circles, Drive, Google+ Profiles, Pages and Streams, Picasa web albums, Google Voice and YouTube - கணக்குகளை உங்கள் இறப்புக்குப் பின் à®®ாà®±்றலாà®®்! வாà®°ுà®™்கள்...


INACTIVE  ACCOUNT  MANAGER


         à®®ின்னஞ்சல் பயன்படுத்தி வருபவர்கள் திடீà®°ென இறந்து விட்டால் அவர்களின் கணக்கில் உள்ள தகவல்கள் அனைத்தையுà®®் என்ன செய்வது எனத் தீà®°்à®®ானிக்குà®®் வசதியை கூகிள் கொண்டு வந்திà®°ுக்கிறது.   


                Google Inactive Account Manager  என்à®± இந்த வசதியின் à®®ூலம் குà®±ிப்பிட்ட காலம் நமது கணக்கைத் தொடர்ச்சியாக பயன்படுத்தாமல் இருந்தால் நமது கணக்கை என்ன செய்ய வேண்டுà®®் என à®…à®®ைக்கலாà®®்.


          இதன் படி குà®±ிப்பிட்ட காலத்திà®±்கு பின்னர் இணையத்தில் உங்கள் à®®ின்னஞ்சல் கணக்கு பாதுகாப்பான à®®ுà®±ையில் à®…à®´ிக்கப்படுà®®் அல்லது நீà®™்கள் குà®±ிப்பிடுà®®் நம்பகமான நபருக்கு தகவல்கள் à®®ாà®±்றப்படுà®®்.


                   Notify Contacts->Add Trusted Contact ->  இந்த வசதியின் à®®ூலம் உங்கள் கணக்கு குà®±ிப்பிட்ட காலத்திà®±்கு à®®ேல் பயன்படுத்தாமல் இருந்தால் அதிகபட்சமாக 10 பேà®°ுக்கு  Notification   செய்தி அனுப்பலாà®®்.   à®®ேலுà®®் உங்களின் கூகிள் கணக்கின்  Contacts  மற்à®±ுà®®் தகவல்களை அனைத்தையுà®®் நம்பகமானவர்களுக்கு அனுப்பி பகிà®°்ந்து கொள்ள à®®ுடியுà®®்.  


                உதாரணத்திà®±்கு உங்களுக்குப் பின் உங்கள் மனைவிக்கோ குழந்தைகளுக்கோ தகவல்களை கிடைக்கச் செய்யலாà®®்.


கீà®´்க்கண்ட சேவைகளை அடுத்தவருக்கு அனுப்பலாà®®்.


+1sBloggerContacts and CirclesDriveGmailGoogle+ ProfilesPages and Streams,  Picasa web albums,  Google Voice  and  YouTube


.


                    Timeout Period ->   இதற்கான  காலமாக  3, 6, 9  à®®ாதங்கள்,  1 வருடம்  என à®…à®®ைக்கலாà®®்.  

                 கூகிள் இந்த வசதியை செயல்படுத்துவதற்கு à®’à®°ு à®®ாதத்திà®±்கு à®®ுன்பு உங்களின் à®®ொபைல்க்கு  SMS  ஒன்à®±ுà®®் நீà®™்கள் கொடுத்திà®°ுக்குà®®் இரண்டாவது à®®ின்னஞ்சல் à®®ுகவரிக்கு à®®ெயிலுà®®் அனுப்பி தகவல் தெà®°ிவிக்குà®®். உங்களிடமிà®°ுந்து பதில் வரவில்லையெனில் இந்த செயல்பாட்டினை கூகிள் செய்து விடுà®®் 


.


         இதனைச் செயல்படுத்த Google Account Settings பக்கத்திà®±்குச் செல்ல வேண்டுà®®்.

 (அல்லது)
 
நேரடியாக கீà®´ுள்ள சுட்டியைக் கிளிக் செய்து செல்லுà®™்கள். எல்லா à®…à®®ைப்புகளையுà®®் செய்து விட்டு Enable பட்டனைக் கிளிக் செய்து விடவுà®®்.


Design by New Themes | Bloggerized by anand R - goodluckanjana | All-in-One Website
back to top