.......................................................................... ....................................................................... ......................................................................
Showing posts with label Computer Tips. Show all posts

Wednesday 16 October 2013

3 Simple Ways to Disable USB Ports!

Flash Drives are nowadays are the most common way to transfer data from one system to another
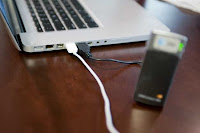
quickly. USB ports are like open doors to allow anyone to enter your system if it is turned on. But you can disable USB ports on your PC to stop intruders to infect your system with malicious data or to prevent someone to steal anything from your system. There are some common ways discussed below to completely disable USB ports on your Windows PC.

1. Disabling through BIOS

This one is the easiest to follow. At system boot up, BIOS contains all the hardware information and configuration options through which you can easily enable disable any hardware installed inside your system.

1. At system startup press DEL or F2 key to open BIOS settings.
2. In BIOS, find “Advanced Settings” or “Onboard Devices” menu (this may vary due to different BIOS manufacturers)


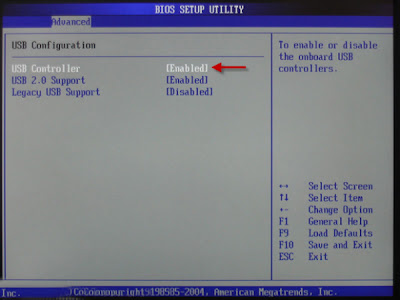
3. Find “USB Configuration” and disable USB Controllers to disable all USB ports.

2. Disabling through Device Manager

This method would be more comfortable for those who are not familiar with BIOS configuration.

1. Click Start > RUN
2. Type “devmgmt.msc”  (this will open Device Manager of Windows)


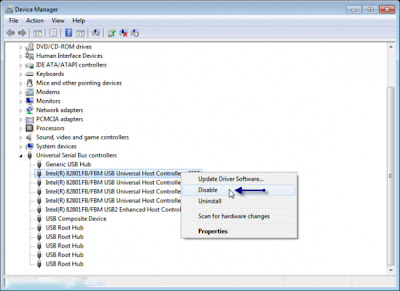
 3. Under Universal Serial Bus Controller, right click and click “Disable” on all the USB drives you can see under the submenu.

3. Disabling through Registry Editor

This is the most secure wasy, as the settings cannot be altered by anyone except system administrator who know how to use Registry Editor.

1. Click Start > RUN
2. Type “regedit”  (this will open Registry Editor of Windows)

3. Locate, and then click the following registry key:

HKEY_LOCAL_MACHINESYSTEMCurrentControlSetServicesUSBSTOR

4. In the right pane, double-click Start.

5. In the Value data box, type 4, click Hexadecimal (if it is not already selected), and then click OK.

6. Quit Registry Editor.


 By default the Hexadecimal value is set to 3, which means enabled. To re-enable USB ports change this value back to 3.

Tips For Speeding Up an Old PC!

It’s so easy to feel frustrated with your 2-year old computer. With the latest whizz-bang gadgets coming out every month, your trusty desktop can seem like it is an old classic. The sleeker models with all the upgrades can make your computer unit feel like it is truck beside a sports car.  But, don’t throw it out just yet. There are so many things that you can do to make it perform like it is new.

Here are a few things that can help you do that:

Get Space

Everyone needs space, even your computer. We end up with more than a few bytes of photos, music, movies and programs in this digital world. All this data takes time to read and process. These precious milliseconds add up and can make simply booting up your computer and surfing on the net feel like an eternity.

There are 3 things you can do to solve the space issue. First, clean-up your hard disk. Delete temporary internet files, empty your recycle bin and uninstall programs that you rarely use. If you still have a lack of space, transfer your files to an external drive. This way your computer does not always have to process it when you boot up. If all fails, consider replacing your current hard disk with a solid-state HD. Without any moving parts, the speed of processing and writing files takes less time. It’ll make downloading and processing files faster.

Add RAM


You do not need to replace your computer to get a faster unit. Look into buying and installing a higher RAM card. The difference can be quite exponential between a 2 gig and a 4 gig RAM card.  You’ll be able to play better games and run memory heavy programs smoother. If you are into watching high definition movies or playing games that are heavy on graphics, consider buying a better video card. This way you can get the extra memory to keep your computer from lagging.

Reinstall Your OS

If none of the above is working for you, consider “renewing” your computer by reinstalling your operating system. It can be quite tedious to do, but will be worth the effort. Reinstalling your OS will help you remove malware and other programs that slow down your computer. You can also start fresh by choosing the right programs and file management protocols to keep your computer zipping along smoothly.

The Bottom Line:

Don’t just be consumers; instead, think of yourself as a “tuner”. Consider modifying and upgrading components of your computer before you head out and buy cheap desktops. It’ll save you a lot of money, and, most of all, can be quite fun to do.

10 Ways to Keep Hard Drives from Failing!

Takeaway: with a little proactive care, you can extend hard drive life, squeezing more value from your company’s equipment investments, reducing user downtime, and preventing catastrophic loss of data.

Hardware prices have dropped considerably over the last decade, but it’s irresponsible not to care for the hardware installed on machines. This is especially true for hard drives. Hard drives are precious commodities that hold the data employees use to do their jobs, so they should be given the best of care. Inevitably, those drives will die. But you can take steps to prevent a premature hard disk death. Let’s examine 10 such steps to care for the health of your drives.


1,Run chkdsk

Hard disks are eventually going to contain errors. These errors can come in the shape of physical problems, software issues, partition table issues, and more. The Windows chkdsk program will attempt to handle any problems, such as bad sectors, lost clusters, cross-linked files, and/or directory errors. These errors can quickly lead to an unbootable drive, which will lead to downtime for the end user. The best way I have found to take advantage of chkdsk is to have it run at next boot with the command chkdsk X: /f where X is the drive you want to check. This command will inform you the disk is locked and will ask you if you want to run chkdsk the next time the system restarts. Select Y to allow this action.


2,Add a monitor

Plenty of applications out there will monitor the health of your drives. These monitors offer a host of features that run the gamut. In my opinion, one of the best choices is the Acronis Drive Monitor, a free tool that will monitor everything from hard drive temperature to percentage of free space (and everything in between). ADM can be set up to send out email alerts if something is amiss on the drive being monitored. Getting these alerts is a simple way to remain proactive in the fight against drive failure.


3,Separate OS install from user data

With the Linux operating system, I almost always separate the user’s home directories (~/) from the OS installation onto different drives. Doing this ensures the drive the OS is installed upon will enjoy less reading/writing because so much of the I/O will happen on the user’s home drive. Doing this will easily extend the life of the drive the OS is installed on, as well as allow you to transfer the user data easily should an OS drive fail.


4,Be careful about the surrounding environment

Although this seems like it should go without saying, it often doesn’t. On a daily basis, I see PCs stuck in tiny cabinets with zero circulation. Obviously, those machines always run hot, thus shortening the lifespan of the internal components. Instead of shoving those machines into tight, unventilated spaces, give them plenty of breathing room. If you must cram a machine into a tight space, at least give it ventilation and even add a fan to pull out that stale, warm air generated by the PC. There’s a reason why so much time and money have gone into PC cooling and why we have things like liquid cooling and powerful cooling systems for data centers.


5,Watch out for static

Here’s another issue that should go without saying. Static electricity is the enemy of computer components. When you handle them, make sure you ground yourself first. This is especially true in the winter months or in areas of drier air. If you seem to get shocked every time you touch something, that’s a good sign that you must use extra caution when handling those drives. This also goes for where you set those drives down. I have actually witnessed users placing drives on stereo speakers, TVs, and other appliances/devices that can give off an electromagnetic wave. Granted, most of these appliances have magnets that are not strong enough to erase a drive. But it’s a chance no one should take.


6,Defragment that drive

A fragmented drive is a drive being pushed to work harder than it should. All hard drives should be used in their most efficient states to avoid excess wear and tear. This includes defragmenting. To be on the safe side, set your PC(s) to automatically defrag on a weekly basis. This works to extend the life of your drive by keeping the file structure more compact, so the read heads are not moving as much or as often.


7,Go with a solid state drive

Solid state drives are, for all intents and purposes, just large flash drives, so they have no moving parts. Without moving parts, the life of the drive (as a whole) is naturally going to be longer than it would if the drive included read heads, platters, and bearings. Although these drives will cost more up front, they will save you money in the long run by offering a longer lifespan. That means less likelihood of drive failure, which will cause downtime as data is recovered and transferred.


8,Take advantage of power save

On nearly every OS, you can configure your hard drive to spin down after a given time. In some older iterations of operating systems, drives would spin 24/7 — which would drastically reduce the lifespan of a drive. By default, Windows 7 uses the Balanced Power Savings plan, which will turn off the hard drive after 20 minutes of inactivity. Even if you change that by a few minutes, you are adding life to your hard drive. Just make sure you don’t shrink that number to the point where your drive is going to sleep frequently throughout the day. If you are prone to take five- to 10-minute breaks often, consider lowering that time to no less than 15 minutes. When the drive goes to sleep, the drive is not spinning. When the drive is not spinning, entropy is not working on that drive as quickly.


9,Tighten those screws

Loose mounting screws (which secure the hard drive to the PC chassis) can cause excessive vibrations. Those vibrations can damage to the platters of a standard hard disk. If you hear vibrations coming from within your PC, open it and make sure the screws securing the drive to the mounting platform are tight. If they aren’t, tighten them. Keeping your hardware nice and tight will help extend the life of that hardware.


10,Back up

Eventually, that drive will fail. No matter how careful you are, no matter how many steps you take to prevent failure, the drive will, in the end, die a painful death. If you have solid backups, at least the transition from one drive to another will be painless. And by using a backup solution such as Acronis Universal Restore, you can transfer a machine image from one piece of hardware to another piece of hardware with very little issue.


Other suggestions?

Have you found any of the above steps to be especially helpful in extending the life of a hard drive? What other form of wisdom or magic keeps those disks from failing prematurely? Is there a brand you have found that lasts longer than others? Share your experiences with your fellow Aps Logo readers.

Tuesday 15 October 2013

Build Your Own Computer Best Configurations for all Budget 2013!

Building your own computer is the best way to get a system which will get you what you want. You can decide what components you want and what you don't . It also helps you to save a lot of money. You can always choose the latest components in the market and keep yourself updated with the technology.


In this post I will tell you the best configuration for building your own computer for all the budget ranges. While, this might not be exactly the best, but this will give you a good performance and speed.


Basic Rig

This is for people, who just want to browse the Internet, do some word processing. These are best for office related work. But if your office uses applications like Photoshop, or any Video Editing Software like Adobe After Effects, this won't give good performance. Choose this, if you are really in a tight budget and just need a computer for normal work.

    Cooler Master Elitie 310
    Processor: AMD Anthlon 2 x2 260
    Motherboard : ASUS M5A78L-M LX
    RAM: Corsair Desktop RAM 2GB DDR3 1333 MHz
    HDD: Seagate 1TB
    Monitor: BenQ G610HDAL
    Graphics Card: None
    Cabinet : Cooler Master Elite 310
    PSU: FSP Saga II 400W
    Speaker: Altec Classic Audio BXR1221
    Mouse: Zebronics Judwas 5
    Keyboard: Zebronics Judwas 5
    Optical Drive: LG 22x SATA DVD Writer
    Sound Card: None


You can choose the speakers, mouse, keyboard as you wish, but keep the heart of the system same.

Entry Level Gaming


This is for gamers who have a small budget but still want to enjoy games. With this specs you will be able to run games like Call of Duty Series and other graphics intensive game. But you have to keep your settings at a minimum level or you might suffer from decreased FPS. And less FPS is a bad thing! Really a bad thing!

    AMD A6-3650
    Processor: AMD A6-3650
    Motherboard : Gigabyte GA-A55M-DS2
    RAM: G-skill F3-10600CL9S- 5GBNT
    HDD: Seagate 1TB
    Monitor: BenQ G2222HD
    Graphics: ASUS 550Ti
    Cabinet : Cooler Master Elite 310
    PSU: Corsair CX340
    Speaker: Altec Lansing V2621
    Mouse: Zebronics Judwas 5
    Keyboard: Zebronics Judwas 5
    Optical Drive: LG 22x SATA DVD Writer
    Sound Card: None


Mid-Range Level


So, you have a considerable budget and want to go for not the ultimate but, play games at medium graphics without decreasing FPS. Here's what you need.

    Intel Core i5-2400
    Processor: Intel Core i5-2400
    Motherboard : MSI-H67-e35
    RAM: Corsair CML8GXM2A1333C9
    HDD: Seagate 1TB
    Monitor: BenQ G2222HD
    Graphics Card: Zotac nVidia 560
    Cabinet : Cooler Master Elitie 340
    PSU: Seasonic S12 II 520
    Speaker: Altec Lansing V2621
    Mouse: Razer Abyssus
    Keyboard: Razer Cyclosa
    Optical Drive: LG 22x SATA DVD Writer
    Sound Card: None


Ultimate Configuration


Only for people who are absolutely crazy about gaming and want to play the latest game with full maximum settings. This will truly give you a amazing gaming experience. If you have lots of money laying around and you can't think of anything better, go for it.


    Processor: Intel Core i7-2600
    Motherboard : Gigabyte Z77X-UD5H
    RAM: Gskill F3- 12800CL9D- 8GBXL
    HDD: 2x Seagate 1TB + OCZ 2.5 SSD VTX3- 25SAT3-120G
    Monitor: BenQ XL2410T
    Graphics Card: ASUS nVidia GTX 680 2GB
    Cabinet : Cooler Master HAF922
    PSU: Seasonic X850 (80 + Gold)
    Speaker: Logitech Z506
    Mouse: Logitech G9x
    Keyboard: Logitech G510
    Optical Drive: LG 12x Blu-ray OEM RW
    Sound Card: ASUS Xonar DX 7.1

Please tell us about your computer's configuration. If you have any other suggestions please tell us through the comments!

Make Your Old Computer Run Faster Instantly!

It gets really irritating when you use a slow old computer in the age of Quad-Core processors. There are mainly two reasons why you would want to make your old computer run faster. 
   
 ►That's your only computer!
    
►You don't want to throw away your old computer.
Whatever may be the reason, I will give you some ways to help your old computer breath some life.
 
1. Upgrade RAM

Upgrading other parts of the motherboard such as processor or graphics card are out of the question but you can always upgrade your computer's RAM. While it may be difficult to find the right version of RAM for your computer, you can always lookup on classified ads sites and online shopping websites. If lucky, you might get it there.


2. Clean Desktop

Remove all the icons in your desktop. After the cleaning, there should be only two icons - My Computer and Recycle Bin.


3. Clean OS Containing Drive

Remove files from your drive where your OS has been installed. Transfer the files to other drive until the free space is more than 40%.
4. Remove Crappy Softwares

Uninstall crappy softwares like toolbars and others which you don't use. It might seem impossible to get rid of all your beloved programs at first, but do it anyway!


5. Run Disk Defragmenter

When used for a long time, the files in your computer gets fragmented. In simpler words, it gets difficult for your computer to search for the required files and thus making your computer run slow.

Go to - Start > Accessories > System Tools > Disk Defragmenter.

Analyze and then defragment!

6. Adjust For Best Performance

When using a old computer, its better to keep away from the fancy transitions and other stuff.

Right click on My Computer > Advanced System Settings > Under the Advanced Tab, check for Performance and click Settings > Adjust for Best Performance > Apply .
 
7. Run CCleaner

CCleaner is a great piece of software. You can use CCleaner to clean temporary files and fix your registries. Doing both of the task will definitely help improve the performance of your computer.

Story: It had been a long time since I had run CCleaner on my computer. So I decided to run it. You won't believe that I had 12 GB of temporary files on my computer!


8. Clean your CPU 

Open your CPU's cabinet and grab a vacuum cleaner and start blowing on the motherboard. Dust the cobwebs and clean the cabinet completely. 


9. Install a New OS

Most probably you are running Windows OS in your old computer. While its not bad but there are other OS which can run faster on your old computer and one such OS is Puppy Linux.


So here you have it, somes ways to make your old computer run faster. Do you know any other way to do the same? Do have have any questions or queries? Do all of that in the comments section below.


Don't forget to share this article with people with old computers!

How to Remove your IP address from the Spam Blacklist !

If you are setting up a mail server at home, you will wonder why the recipient cannot receive your email which is sent by your mail server. The reason is that your IP is blacklisted.
 
 
How to overcome this problem? It is quiet easy and just send a request to the Spamhaus.org to cancel your IP from the blacklist. For example, your IP is 219.192.114.214.
http://spamhaus.org/query/bl?ip=219.192.114.214

If you find any item is in red colour (e.g. PBL), your IP is blacklisted. You just click on the link under the red coloured item. Then, select "Remove an IP from PBL" button. Usually, SBL and XBL are in green colour.


Accepted the agreement and click "Remove IP address" button. Finally, fill in the blanks and wait for the confirmation email for the confirmation code to fill into the screen provided after you sent the request.


Make sure your email address is not a web based free account, such as gmail, hotmail, or yahoo and etc.

Saturday 12 October 2013

How to Download Facebook Video in Android Mobile!

Do you know you can download facebook video in Android Mobile. Lets see detail procedure to download facebook videos in your android phone.As we know there is no option available in Facebook to download a video to our computer and phone as well, we can just watch them in Facebook.


However, we can get our favorite videos directly to our android smart phone using a third-party application called as “ES file explorer” which is available to download for free on Google play store. With using this app, we can store any Facebook video very quickly, and it’s very easy too.  Just scroll down to read step by step fully explained tutorial.

How To Download Facebook Videos in android Mobile:


As I said earlier, we need to use a third-party application to do this. I explained the whole process from the scratch, especially for newbie’s.

  • Go to Google Play store application, search for ES File explorer app there. Once you found it, download and install the app in your device.
  • I hope you already have Facebook android App installed in your device, otherwise download & install it from the same Google play store.
  • Now open the Facebook app, and log in there using your email id and password as usually.
  • Search / open the video which you want to download, and then touch on the play button which appears on center of the video screen.
  • Once you taped on Play button, it will open a pop-up window like shown below.
  • There you need to click on “ES Downloader” if you wish to download that video. Immediately you will see download process of your video.
  • Once downloading has finished, you will see your downloaded video in gallery of your smart phone.
     
That’s all. Now you can start downloading all of your favorite videos to your smart phone, without any cost. The advantage of downloading FB videos to your phone is you will be able to watch them anytime.


To Download → ES file explorer


Saturday 4 May 2013

"RUN" COMMAND


"RUN"  COMMAND


 1.  Add/Remove Programs       : appwiz.cpl 

2.  Accessibility Controls          : access.cpl 
  
3.  Add Hardware Wizard         : hdwwiz.cpl 
  
4.  Administrative tools            : control admintools 
  
5.  Calculator                            : calc 
  
6.  Command Prompt(DOS)    : cmd 
  
7.  Computer Management      : compmgmt.msc 
  
8.  Date/Time Properties         : timedate.cpl 
  
9.  Direct X panel                     : dxdiag 
  
10. Disk De-fragment              : dfrg.msc 
  
11. Display Properties             : control desktop 
  
12. Group Policy editor           : gpedit.msc 
  
13. Fonts Folder                      : fonts 
  
14. Folder Properties              : control folders 
  
15. Internet Properties           : inetcpl.cpl 
  
16. Keyboard Properties         : control keyboard  

17. Log Off Windows              : logoff 
  
18. Mouse Properties             : control mouse 
  
19. Network Connections       : control netconnections   or ncpa.cpl 
  
20. Notepad                            : notepad 
  
21. On-screen Keyboard         : osk 
  
22. Phone/Modem Options    : telephon.cpl 
  
23. Printers Folder                 : printers 
  
24. Power Configuration        : powercfg.cpl 
  
25. Registry Editor                 : regedit 
  
26. Windows services            : services.msc 
  
27. Scanner/Camera              : sticpl.cpl 
  
28. Scheduled Tasks              : control schedtasks 
  
29. System Properties           : sysdm.cpl 
  
30. Taskmanager                   : taskmgr 
  
31. Shut down Windows        : shutdown 
  
32. Sound/Audio Properties  : mmsys.cpl 
  
33. Windows Firewall            : firewall.cpl 
  
34. Windows Magnify            : magnify 
  
35. Utility Manager                : utilman 
  
36. Windows XP Tour            : tourstart 
  
37. Word pad                         : write 
  
38. open "temporary" folder  : temp 
  
39. open "prefetch" folder     : prefetch 
  
40. open "recent" folder        : recent

 
Design by New Themes | Bloggerized by anand R - goodluckanjana | All-in-One Website
back to top